Where do you store the myriad of things left over from home improvement projects? You know, the kinds of stuff that you’re certain will come in handy one day even as a nifty arts and crafts project — but can overrun your garage or workroom in short order? I decided to create my own “custom, hand-crafted” storage unit, made by repurposing two wooden shutters.
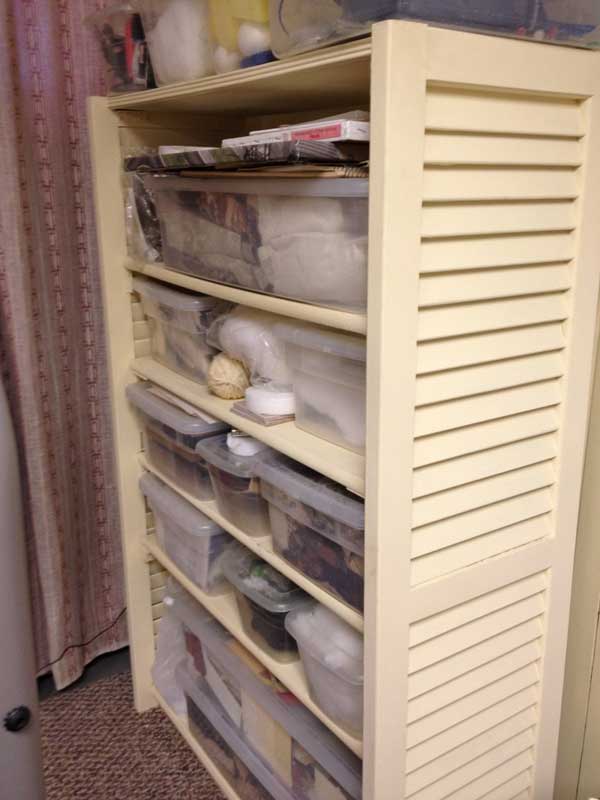
Ilene’s “new” storage unit made from two repurposed window shutters (Image: Courtesy of Ilene Moyher)
Start With Two Window Shutters
Five years ago, my husband and I decided to put on our advanced-amateur designer and carpenter hats, scavenged our tool room and garage, and came up with enough supplies to build something that help me get organized without spending any money. (After all, it would be hypocritical to buy a pre-made, over-packaged, expensive storage unit to house all the stuff I have been saving based on environmental concerns and frugality, right?) We found two exterior window shutters, six scraps of boards, assorted pieces of molding and hardware (hinges, brackets, screws, etc.). All we needed were basic tools: a saw, and a screwdriver, hammer, and a drill.
Voila – A Custom Shelving Unit
A few hours later, a custom shelving unit that fits my supplies just right! Some leftover paint and decorative trim made it quite presentable. It even impressed our friends and family! Building this shelf unit was satisfying on many levels: it fulfilled the exact size and spacing needed, cost nothing to make, kept otherwise unwanted materials out of the landfill, and was a fun, easy project to do one winter afternoon.
Still Standing Strong
Five years later it’s still standing strong (and straight!). Since then we have built another one that fits in a closet in our home office. Then we created an outdoor bar from an old metal table saw stand and a piece of leftover butcher block counter top. (Hmmm…what can we repurpose next?) Have you ever done anything like this? How did it turn out?


Hello Irene,
Great idea! The shelving looks wonderful!
When I was a teen doing my marionette shows for birthdays and libraries, I wrote a script where the storyline went from daytime to bedtime. The puppet would say something about how the sun would be setting soon and would be time to go bed.
I took an old shutter with adjustable louvers controlled by a batten in the back of the shutter and used it in my show. I needed to go from day to night quickly in the story, so this became a window in my “house” set.
I closed the shutter with the louvers facing down and painted the day scene in the “window.” Then I closed the shutters with the louvers facing up and painted the night scene. With a movement of the batten I could change the scene in “outside the window” in a flash from day to night, adding a fun “Wow! That was quick!” from the puppet onstage.
Along those lines….I’m thinking 3 to 4 large louvered shutter rescues could be hinged together, accordion style to make a folding screen. For someone interested in decorative painting, a design could be painted on the closed louvers facing up and then a different design on the closed louvers facing down. Two looks with one folding screen!
Mike – Thank you very much! Wow, you were quite clever with your shutters! They are a pain to paint but it’s worth it as usually the old ones are made of nice, solid wood. The idea for the folding screen sounds really interesting. Good luck.
When I first started my blog, I wrote about my mom’s doggie condo. She made almost the entire thing out of 40 year old bifold louvered closet doors. We had changed all the doors in her house to solid doors and hates to waste. So she built a little house under a tree in the breezeway using the doors as the walls. She even painted paw prints on the floor (concrete blocks). Added two dog beds, a door that can be propped open or secured. It’s a convenient spot to secure the dogs when there is a visitor or we have to leave the lot gates open because we trucking something in. The dogs love it and sometimes sleep in there of their own accord, the cool breeze comes in through the vents. It’s really cute.
Tania – That sounds like the best doggie “crib” ever! How fun with the paw prints. 🙂
What other things have you or your mom made? One of my first projects when we moved into our 1970’s fixer upper was that we saved those thick cube-like glass squares from the old lighting fixtures and now I use them as candle holders. They’re really funky and remind us of how far we’ve come in transforming the house.
Irene,
I love this idea for reusing window shutters. One of my favorite things to repurpose is old windows. Somehow, growing up in Georgia we always have had extra windows around. I’m not sure if this is a southern thing or just my luck.
Either way, a fast and easy way to give old windows new life is to turn them into chalkboards! You can use any window you have; I have used 6-pane windows, 2-pane windows, and solid pane windows. Depending on where you want to use the chalkboard, any type will work. All you have to do is buy a chalkboard paint from the hardware store, tape off the edges of the pane with painter’s tape, and apply a few coats of paint directly to the glass.
After the paint dries, remove the tape and use a solid anchor to hang the window wherever you please. These chalkboards look great, are fun to make, and have a built in ledge to store your chalk!
Hi Ireene,
What a great idea! I also like to try my hand at amateur carpentry. I’ve repurposed a lot of our old household items throughout the years and I’m always happy to see others doing the same. Last year I ended up tearing down a wooden playground behind my family’s house and I kept all the pieces for just this reason. I decided to reuse the wood to build a compost bin, which not only saved me some money but also kept the project very green.
I ended up not having to buy any extra supplies or wood and the compost bin has been a great addition for my garden. Now I have access to fresh fertilizer year round. It’s a very rewarding experience to turn something old into something new and beautiful. I’m glad to see that your shelves came out so well and I’d love to see some of your other projects too!
Wow, more great ideas and successful projects. You all have inspired me. I can’t wait to work on some new projects this spring and summer, with some leftover wood, bricks, paint, hardware, fabric…. hmmm…. I’ll have to get creative! Have fun with your projects and please keep sharing. Thanks! Ilene
This is such a fun idea! I’m a huge fan of DIY projects, and if they’re eco-friendly, all the better! As a student living in on-campus, apartment-style housing, this is a super exciting and motivating post – it gave me the idea to host a repurposing/DIY dorm decorating workshop in the fall!
Looking forward to digging up some more cool repurposing projects!
Jen – what a great idea about hosting the workshop! I bet people will have all sorts of ideas and supplies. By supplies, I mean stuff that was headed to the garbage, not because it was truly garbage, but simply because people hadn’t yet had a moment of inspiration or the chance to do something creative and useful with it! Good luck and please share the outcomes.
What a great idea! I have been seeing a lot of old window panes being used as multi-photo frames, and this idea keeps with that theme. I’m curious – were these old window shutters from your own home, or did you find them elsewhere? I love this aesthetic, but as a renter, am challenged to find the supplies. Any tips?
Hi Pooja – Thank you! Yes, these were from my house. I save stuff that I think can be reused at some point, even if I don’t know what for. Only things that are in decent condition and would otherwise end up in a landfill, because of my storage space limits and wanting to keep it organized. If you have any friends who are updating their home, or who work in construction/demolition, they may be able to share some ‘treasures’ with you. Otherwise, if you have access to a Habitat for Humanity Restore, they have used windows and other similar items for low cost. http://www.habitat.org/restores. The only other thing I can suggest is that when you are working on ANY project, look at what you’re about to throw away and think about it creatively, that it may have another life as something else…. and when you are going to buy something that you really don’t want to spend money on, look around and see if you can make it from things you already have. Good luck and have fun!
Thanks for the info Ilene! I love that you reused your OWN personal shutters – it not only reduces your personal footprint, but makes for a far better story 🙂 I’d love to know what other potentially useful items you have stored and if any of them have ended up in projects like this one.
Pingback: Making Waste Watching Fun, Easy — and Mainstream